
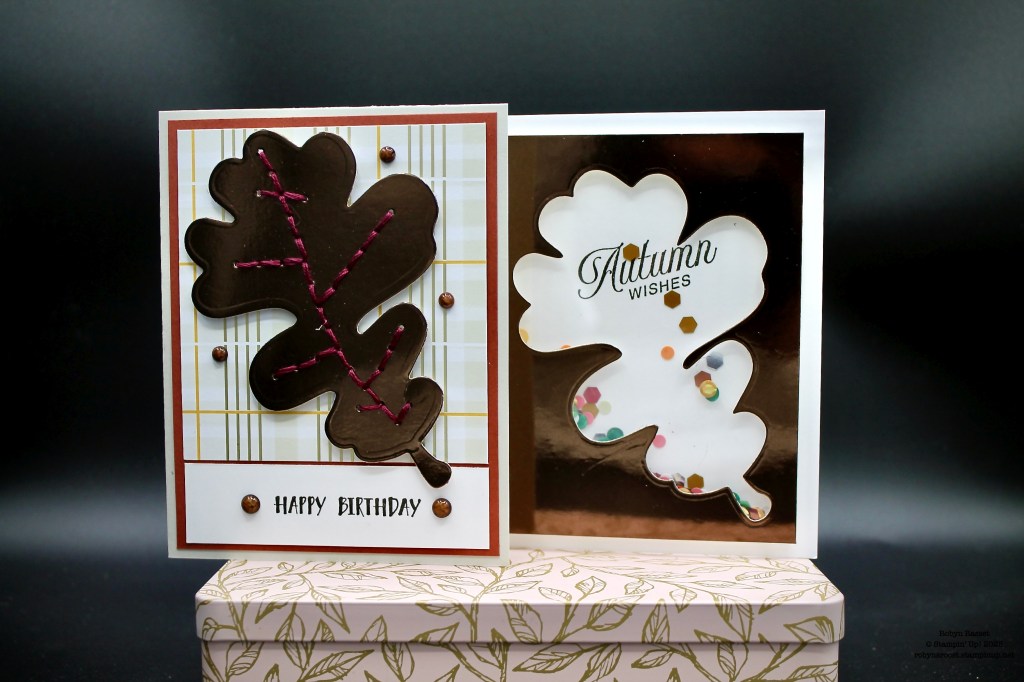
These two cards use the large oak leave die from the Gathering Moments Die set. One uses the cut out leaf while the other uses the negative (trash, lol) piece that is left over to create a shaker card.
We crafters loving using scraps!!! The trick is to start with a piece of paper that is 3 3/4″ x 5″ and place the die so that it is centered on the paper (Earthen Toned Metallic used here).
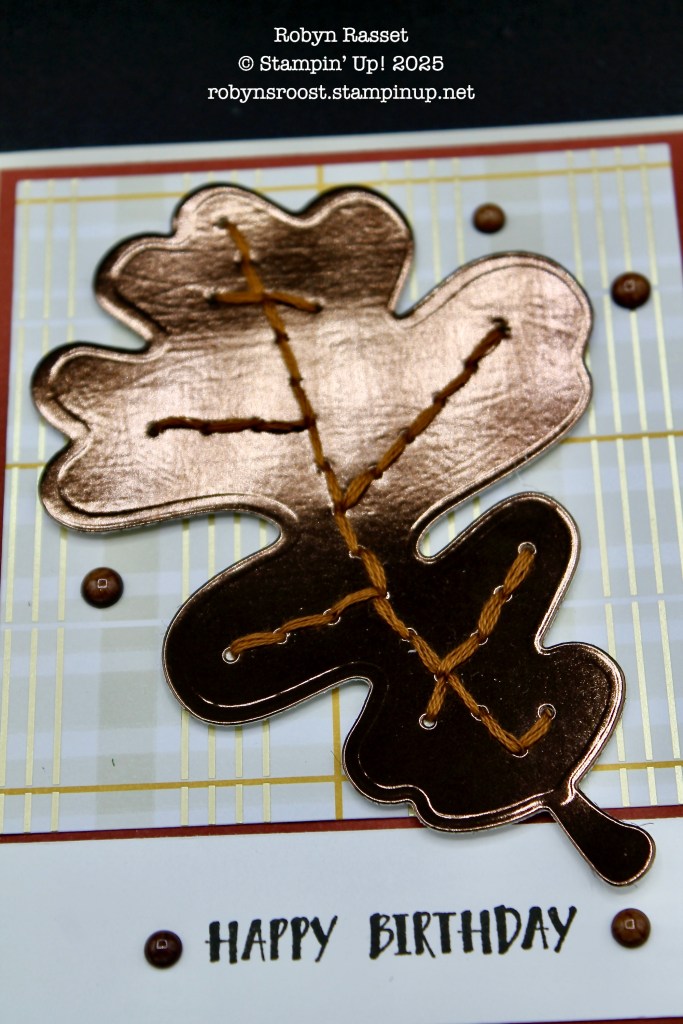
Here is a close up of the leaf done with a backstitch. The die cuts out the holes which can be used to add stitching. The Gathering Together Suite (Online Exclusive) even has a pack of Old Olive and Early Espresso Linen Thread, great for stitching on these leaves. There is also a maple leaf in the set. If you don’t want the holes on the die cut, simply leave out the insert when die cutting, and the outline die will cut out a solid leaf.
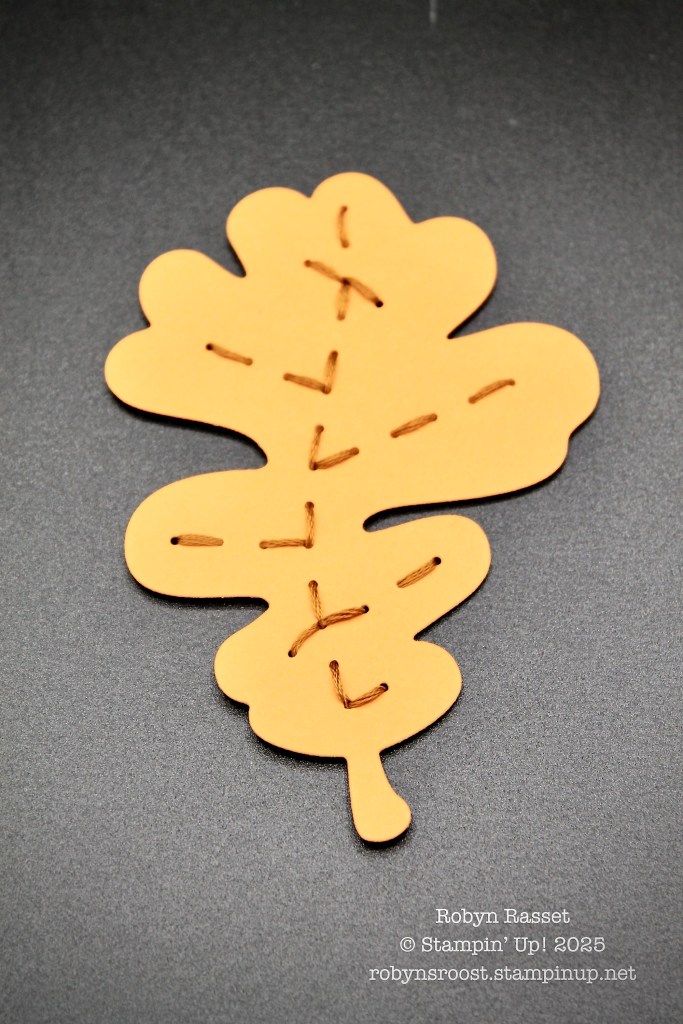
Here is an example of a leaf done with a running stitch. A little quicker and a different look. I used to do tons of embroidery projects (before kids and when I could see better, lol) so I have a BUNCH of embroidery floss skeins and used them for these leaves.
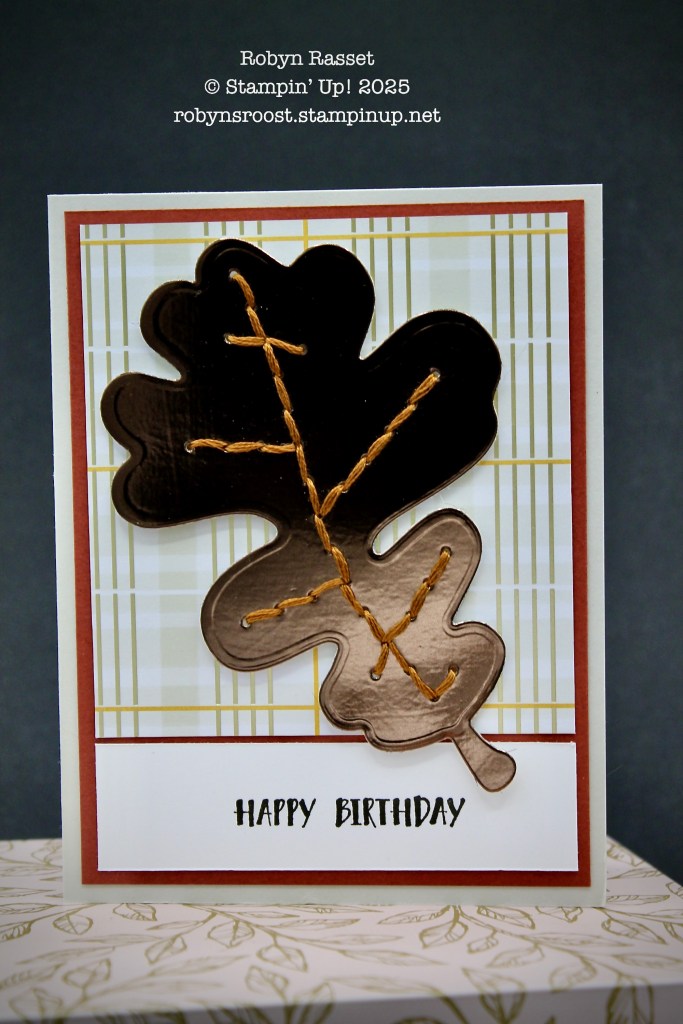
The foiled paper behind the leaf is from the Gathering Together Designer Series Paper Pack and the greeting is from The Right Words set.
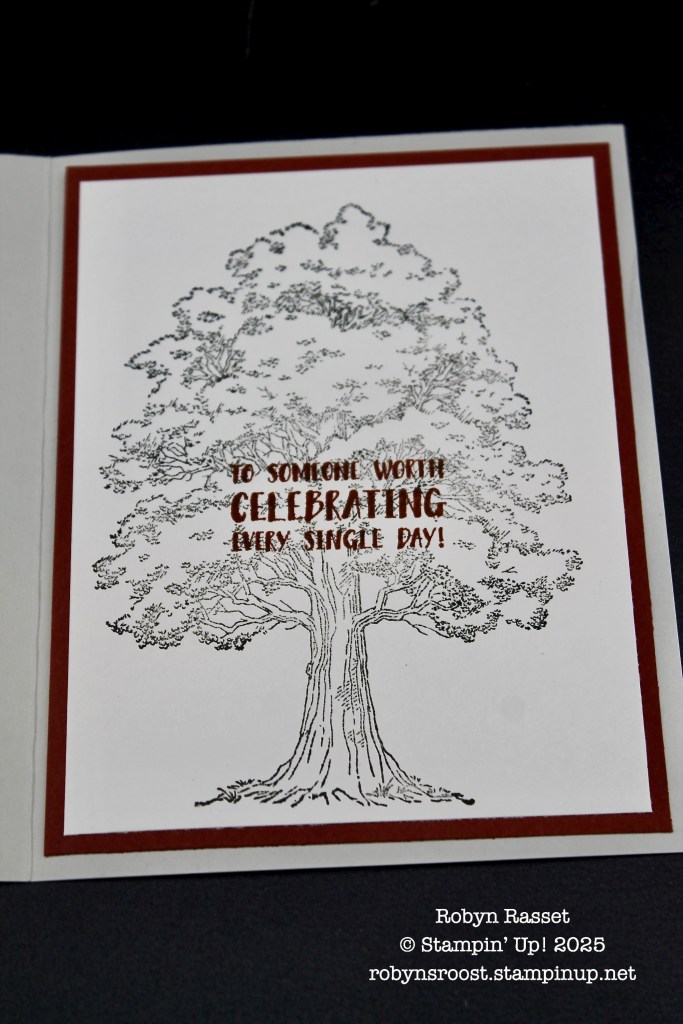
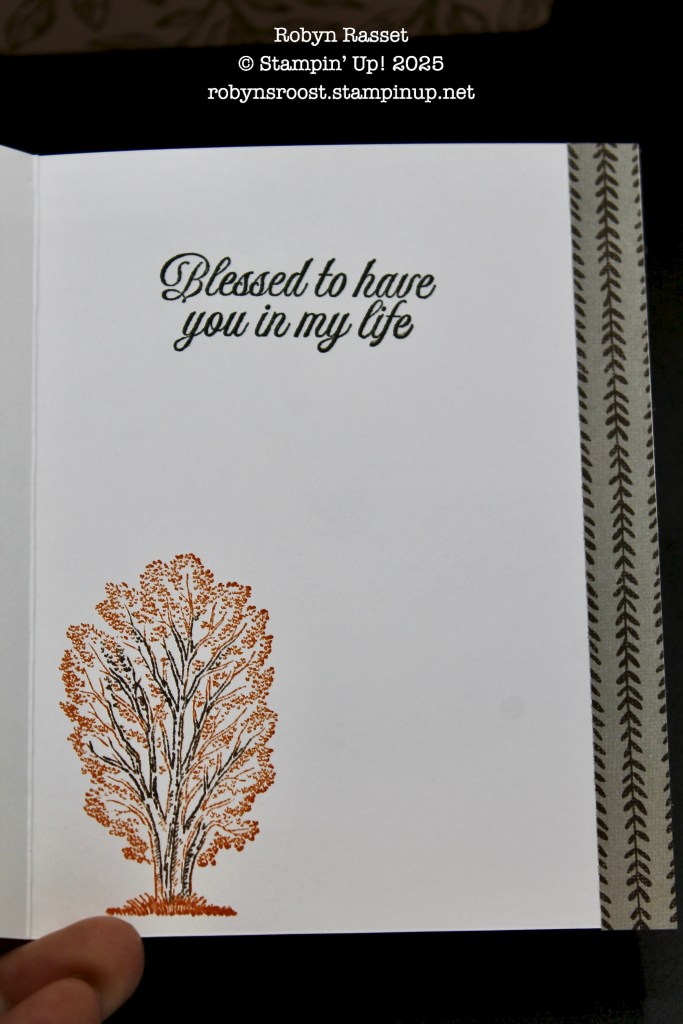
For the inside of the card, I pulled in the beautiful, large tree from the Autumn Trees stamp set, which is part of the Autumn Toile Suite.
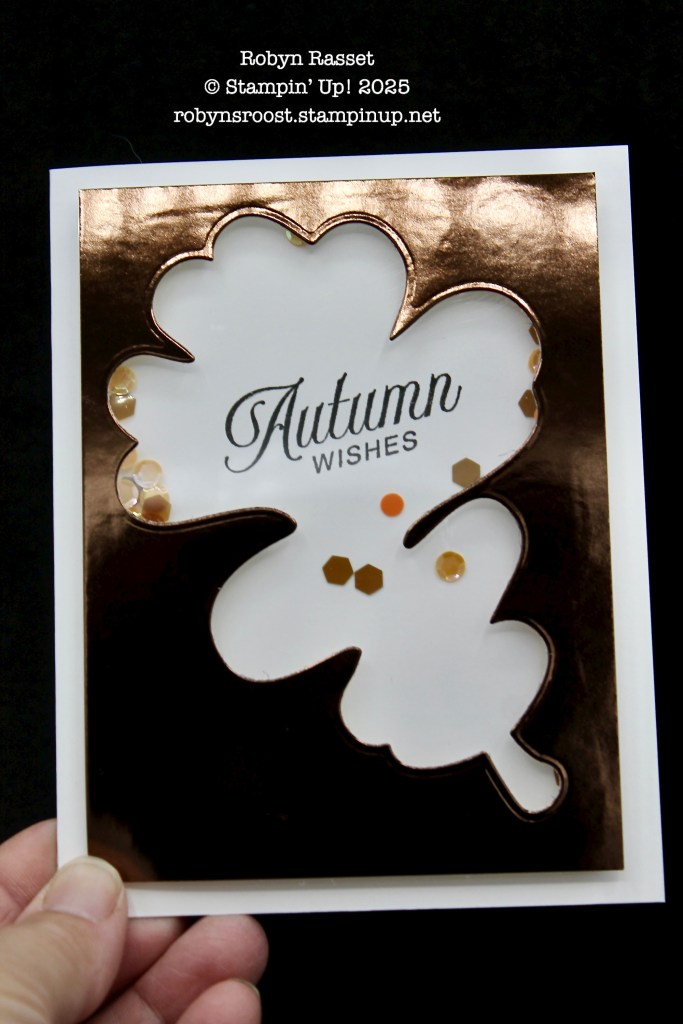
Our second card is a shaker card, made with a piece of trash. I feel so frugal when I can use something that would have been thrown away!
Use a pencil to lightly mark where the greeting should be placed on the card front and stamp the greeting directly onto the card front. Erase the marks if they show.
Foam Strips make it easy to create the space needed for the sequins. Adhere a window sheet to the back of the leaf layer, I like to use liquid glue, add the foam strips around the edge and close to the leaf and this piece is all ready to assemble.
Place a pile of sequins on the greeting. Remove the strips which cover the adhesive on the foam and center the leaf layer on the card front. I like to stand up for this part to get it centered on the card front.
The inside of this card features another technique, which sadly isn’t going to be as common once the red rubber stamps and Stampin’ Write Markers are gone. This tree from the Autumn Trees stamp set was inked with Pumpkin Pie ink, then an Early Espresso Stampin’ Write Marker was used to outline the tree trunk and branches, directly on the rubber stamp. Gently blow on the stamp to make sure it’s still wet and then stamp on the card.
I absolutely LOVE the font on these greetings from the Amber Autumn!
If you would like to SEE these cards being created, be sure to watch my Gathering Moments Die Set, Two Cards One Die Cut Video Tutorial. While you’re there check out all the other video tutorials on my site.
Product List – Click on the links below to purchase the supplies used on these cards.
![Autumn Trees Cling Stamp Set [ 165896 ]](https://assets1.tamsnetwork.com/images/EC042017NF/165896s.jpg "Autumn Trees Cling Stamp Set [ 165896 ]")
|
|||
![Basic Beige 8 1/2" X 11" Cardstock [ 164511 ]](https://assets1.tamsnetwork.com/images/EC042017NF/164511s.jpg "Basic Beige 8 1/2\" X 11\" Cardstock [ 164511 ]")
|
![Cajun Craze 8-1/2" X 11" Cardstock [ 119684 ]](https://assets1.tamsnetwork.com/images/EC042017NF/119684s.jpg "Cajun Craze 8-1/2\" X 11\" Cardstock [ 119684 ]")
|
||
![Basic White 8 1/2" X 11" Cardstock [ 166780 ]](https://assets1.tamsnetwork.com/images/EC042017NF/166780s.jpg "Basic White 8 1/2\" X 11\" Cardstock [ 166780 ]")
|
|||
![Window Sheets [ 142314 ]](https://assets1.tamsnetwork.com/images/EC042017NF/142314s.jpg "Window Sheets [ 142314 ]")
|
![Gathering Moments Dies [ 165979 ]](https://assets1.tamsnetwork.com/images/EC042017NF/165979s.jpg "Gathering Moments Dies [ 165979 ]")
|
||
![Foam Adhesive Sheets [ 152815 ]](https://assets1.tamsnetwork.com/images/EC042017NF/152815s.jpg "Foam Adhesive Sheets [ 152815 ]")
|
![Stampin' Dimensionals [ 104430 ]](https://assets1.tamsnetwork.com/images/EC042017NF/104430s.jpg "Stampin' Dimensionals [ 104430 ]")
|
![Amber Autumn Cling Stamp Set (English) [ 165883 ]](https://assets1.tamsnetwork.com/images/EC042017NF/165883s.jpg "Amber Autumn Cling Stamp Set (English) [ 165883 ]")
![The Right Words Cling Stamp Set (English) [ 165316 ]](https://assets1.tamsnetwork.com/images/EC042017NF/165316s.jpg "The Right Words Cling Stamp Set (English) [ 165316 ]")
![Early Espresso Classic Stampin' Pad [ 147114 ]](https://assets1.tamsnetwork.com/images/EC042017NF/147114s.jpg "Early Espresso Classic Stampin' Pad [ 147114 ]")
![Cajun Craze Classic Stampin' Pad [ 147085 ]](https://assets1.tamsnetwork.com/images/EC042017NF/147085s.jpg "Cajun Craze Classic Stampin' Pad [ 147085 ]")
![Pumpkin Pie Classic Stampin' Pad [ 147086 ]](https://assets1.tamsnetwork.com/images/EC042017NF/147086s.jpg "Pumpkin Pie Classic Stampin' Pad [ 147086 ]")
![Gathering Together 12" X 12" (30.5 X 30.5 Cm) Specialty Designer Series Paper [ 165969 ]](https://assets1.tamsnetwork.com/images/EC042017NF/165969s.jpg "Gathering Together 12\" X 12\" (30.5 X 30.5 Cm) Specialty Designer Series Paper [ 165969 ]")
![Earthen Toned Metallic 12" X 12" (30.5 X 30.5 Cm) Specialty Paper [ 165901 ]](https://assets1.tamsnetwork.com/images/EC042017NF/165901s.jpg "Earthen Toned Metallic 12\" X 12\" (30.5 X 30.5 Cm) Specialty Paper [ 165901 ]")
![Very Vanilla 8 1/2" X 11" Cardstock [ 166784 ]](https://assets1.tamsnetwork.com/images/EC042017NF/166784s.jpg "Very Vanilla 8 1/2\" X 11\" Cardstock [ 166784 ]")
![Basic White 8 1/2" X 11" Thick Cardstock [ 159229 ]](https://assets1.tamsnetwork.com/images/EC042017NF/159229s.jpg "Basic White 8 1/2\" X 11\" Thick Cardstock [ 159229 ]")
![Autumn Toile 12" X 12" (30.5 X 30.5 Cm) Designer Series Paper [ 165882 ]](https://assets1.tamsnetwork.com/images/EC042017NF/165882s.jpg "Autumn Toile 12\" X 12\" (30.5 X 30.5 Cm) Designer Series Paper [ 165882 ]")
