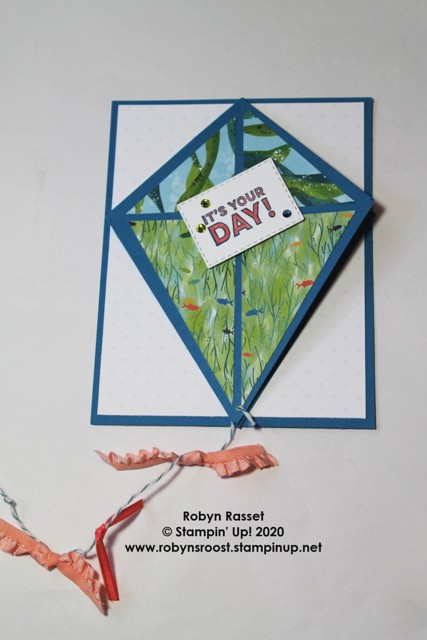
Celebrate a special day with this fun Kite Card! What memories do you have of kite flying? I remember one time working for hours (ok, it was probably 20 minutes, I was only about 8) and crashing my kite and breaking it within minutes. I also remember a really neat kite that one of my son’s had that was shaped like an owl. It looked so real when it was flying.
This kite card is a bit tricky to make but is well worth the effort.
Directions:
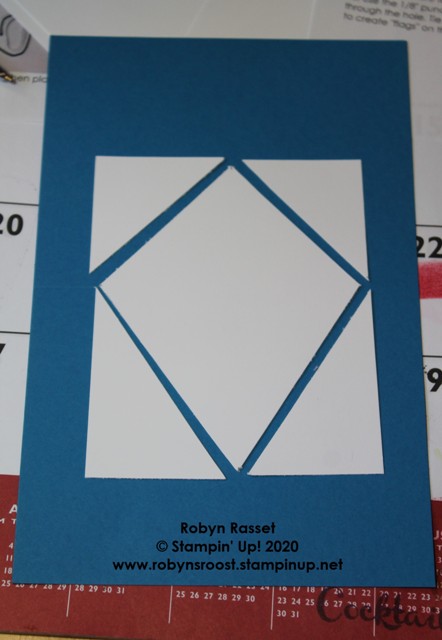
1. Cut a 5 1/2″ x 4 1/4″ base of Pacific Point.
2. Cut a 5 1/4″ x 4″ piece of Whisper White and adhere to base.
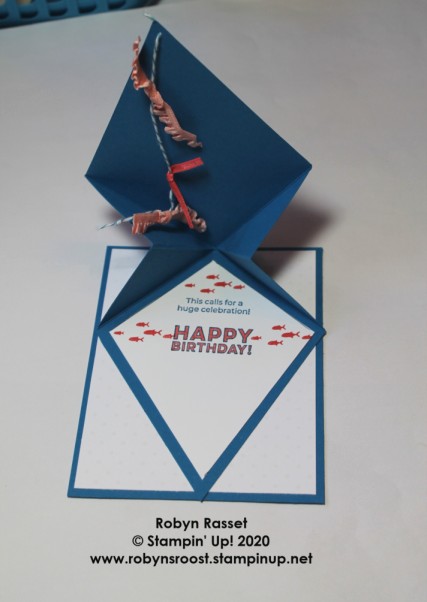
3. Cut a 4 1/4″ x 11″ piece of Pacific Point and score at 5 1/2″. Mark 2″ from the score line on all 4 sides. Score between the marks so that you make an X which intersects the original score line in the center. Fold and burnish these score lines, lining up the card base edges. Tuck in the original score line so that it meets in the inside center of the kite. This is the top of the kite.
4. On the bottom edge of the kite piece, make a mark at 2 1/8″ (half). Cut through both layers from the corner fold to the middle mark. Do this on both sides to create the bottom half of the kite.
5. For the inside white liner, start with a piece that is 3 3/4″ x 4 3/4″ make a mark at 1 3/4″ on each long side. Make a mark at the center of the top and bottom at 1 7/8. Cut off the corners using the marks to create the kite shape.
6. For the DSP on the front, for the top of the kite. Start with a 1 3/4″ square and cut diagonally.
For the bottom of the kite, start with 2 pieces that are 1 3/4″ x 3″. Place the 2 pieces same sides together and cut diagonally. This will give you 2 sets one for each side of the DSP. Adhere these to the kite.
7. Stamp the front greeting onto a scrap of whisper white and cut out with the small die from the Stitched Rectangle Die set. Add rhinestone jewels and adhere to the center of the kite with dimensionals.
8. Stamp the inside greetings onto the inside of the card. Use a Calypso Coral Marker to color in the words. Stamp the fish with Calypso Coral ink.
9. Adhere the kite to the card base.
10. Use a small (1/8″ or 1/4″) circle punch to make a hole in the bottom tip of the kite and put a 6″ piece of Baker’s Twine through the hole. Tie a knot in both ends. Add 3 additional pieces of ribbon tied to the Baker’s Twine to create “flags” on the kite tail. The ribbon that I have used on this project is retired but any ribbon will work.
The Whale Done stamp set can be purchased with a the matching Whale Builder Punch and the Many Mates stamp set comes with the gorgeous Many Medallions Dies.
Product List

|
|

|
|

1/8″ Circle Handheld Punch
[140972]
$0.00
|
")
")


 Designer Series Paper")