I’ve always in my 14 years as a demonstrator, avoided trying the Shaving Cream technique. I’m not usually afraid of making a mess but I’m not fond of strong odors and I really didn’t see the need to try it, but I saw a card on SplitCoastStampers and had to give it a try.
Warning – IT IS MESSY-
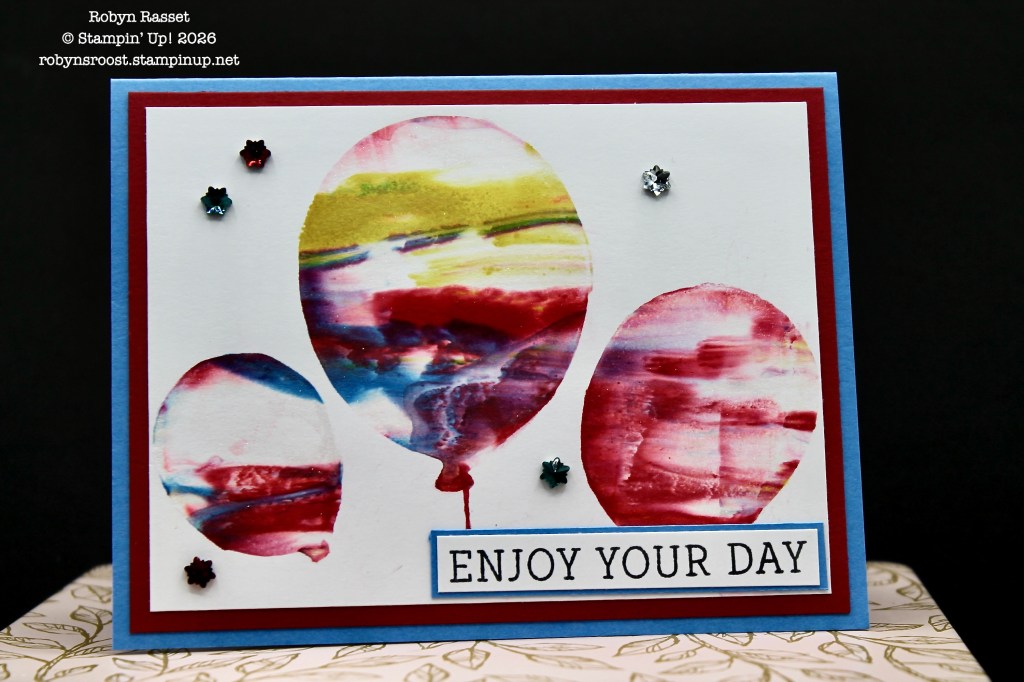
For my first card, I started with a window sheet that was 5″ x 3 3/4″ and placed 3 ballon dies on it and die cut. Then I taped the mask over a piece of Basic White paper. I followed the directions on the Splitcoaststampers Tutorial. I used Real Red, Darling Duckling, and Azure Afternoon inks to color the shaving cream.
I think the trick is to get enough shaving cream with colors picked up on your spatula (old credit card etc) to make just one swipe across the mask. Adding more color to missed spots didn’t work well.
I brushed some Wink of Stella over the balloons once they were dry and had been cleaned with a paper towel. I liked the sparkle that it added.
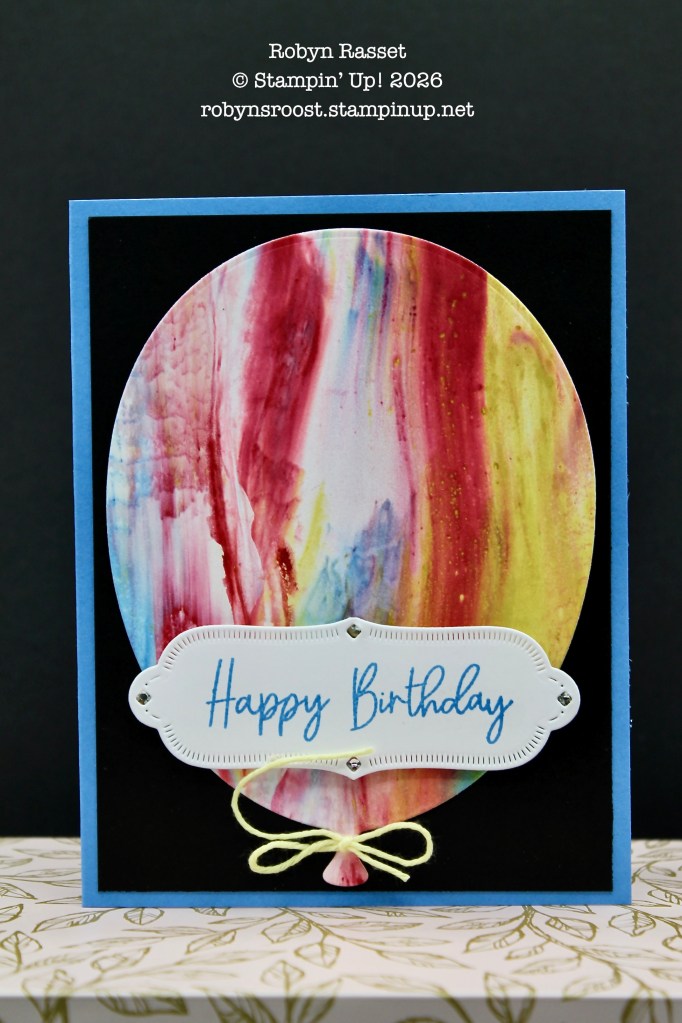
For my second card, I simply added the Shaving Cream to a 4″ x 5 1/2″ piece of Basic White and then die cut it dried. MUCH EASIER! The label is die cut from the Sweet Words & Labels Die set, part of the Silly Old Bear Suite.
I used the same paper plate full of Shaving Cream for all 3 cards plus I have another panel that I haven’t used. The colors did tend to get muddied after taking several scoops out of it.
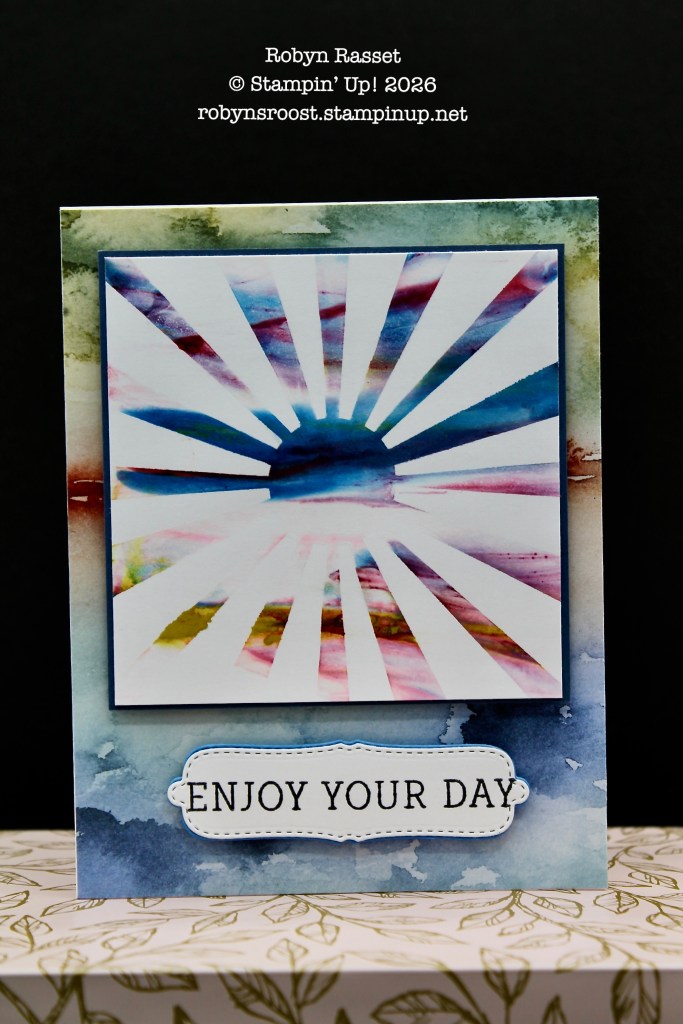
This image was created using a premade mask. I think it came from the 12 Days of Christmas Advent Calendar. I started with a larger piece of Basic White paper and then trimmed it down so that the pretty paper in the background would show on all 4 sides.
The Thoughtful Journey Designer Paper was cut to 4 1/4″ x 5 1/2″ and covers the entire front of the white card base. The greeting is stamped on another label die from the Sweet Words & Labels die set. If you look closely there is a second label done with Azure Afternoon that was cut in half the long way and layered under the white label to create a shadow.
Both the focal image and the greeting are popped up with dimensionals. The focal image is matted with Misty Moonlight. I haven’t added any embellishments. Do you think I should?
I’d love to hear which card you like best and do you think you would try this technique?
Thanks for stopping by for a visit at The Roost! Hope you have a great day.
Product List for Card One
![Balloon Festoon Bundle (English) [ 167606 ]](https://assets1.tamsnetwork.com/images/EC042017NF/167606s.jpg "Balloon Festoon Bundle (English) [ 167606 ]")
|
![Window Sheets [ 142314 ]](https://assets1.tamsnetwork.com/images/EC042017NF/142314s.jpg "Window Sheets [ 142314 ]")
|
||
![Tuxedo Black Memento Ink Pad [ 132708 ]](https://assets1.tamsnetwork.com/images/EC042017NF/132708s.jpg "Tuxedo Black Memento Ink Pad [ 132708 ]")
|
![Basic White 8 1/2" X 11" Cardstock [ 166780 ]](https://assets1.tamsnetwork.com/images/EC042017NF/166780s.jpg "Basic White 8 1/2\" X 11\" Cardstock [ 166780 ]")
|
![Real Red 8-1/2" X 11" Cardstock [ 102482 ]](https://assets1.tamsnetwork.com/images/EC042017NF/102482s.jpg "Real Red 8-1/2\" X 11\" Cardstock [ 102482 ]")
|
|
![Clear Wink Of Stella Glitter Brush [ 141897 ]](https://assets1.tamsnetwork.com/images/EC042017NF/141897s.jpg "Clear Wink Of Stella Glitter Brush [ 141897 ]")
|
![Faceted Snowflakes [ 166077 ]](https://assets1.tamsnetwork.com/images/EC042017NF/166077s.jpg "Faceted Snowflakes [ 166077 ]")
|
![Real Red Classic Stampin' Ink Refill [ 103287 ]](https://assets1.tamsnetwork.com/images/EC042017NF/103287s.jpg "Real Red Classic Stampin' Ink Refill [ 103287 ]")
![Darling Duckling Classic Stampin' Ink Refill [ 165280 ]](https://assets1.tamsnetwork.com/images/EC042017NF/165280s.jpg "Darling Duckling Classic Stampin' Ink Refill [ 165280 ]")
![Azure Afternoon Classic Stampin' Ink Refill [ 161668 ]](https://assets1.tamsnetwork.com/images/EC042017NF/161668s.jpg "Azure Afternoon Classic Stampin' Ink Refill [ 161668 ]")
![Azure Afternoon 8 1/2" X 11" Cardstock [ 161719 ]](https://assets1.tamsnetwork.com/images/EC042017NF/161719s.jpg "Azure Afternoon 8 1/2\" X 11\" Cardstock [ 161719 ]")
Product List for Card Two – Large Balloon
|
|
|||
![Sweet Words & Labels Dies [ 167627 ]](https://assets1.tamsnetwork.com/images/EC042017NF/167627s.jpg "Sweet Words & Labels Dies [ 167627 ]")
|
|
![Basic Black 8-1/2" X 11" Cardstock [ 121045 ]](https://assets1.tamsnetwork.com/images/EC042017NF/121045s.jpg "Basic Black 8-1/2\" X 11\" Cardstock [ 121045 ]")
|
|
![Baker's Twine Three Color Pack [ 162759 ]](https://assets1.tamsnetwork.com/images/EC042017NF/162759s.jpg "Baker's Twine Three Color Pack [ 162759 ]")
|
![Rhinestone Basic Jewels [ 144220 ]](https://assets1.tamsnetwork.com/images/EC042017NF/144220s.jpg "Rhinestone Basic Jewels [ 144220 ]")
|
Product List – Card 3 – Enjoy Your Day
|
|
|||
|
|
|
![Balloon Festoon Photopolymer Stamp Set (English) [ 167602 ]](https://assets1.tamsnetwork.com/images/EC042017NF/167602s.jpg "Balloon Festoon Photopolymer Stamp Set (English) [ 167602 ]")
![Basic White 8 1/2" X 11" Thick Cardstock [ 159229 ]](https://assets1.tamsnetwork.com/images/EC042017NF/159229s.jpg "Basic White 8 1/2\" X 11\" Thick Cardstock [ 159229 ]")
![Misty Moonlight 8-1/2" X 11" Cardstock [ 153081 ]](https://assets1.tamsnetwork.com/images/EC042017NF/153081s.jpg "Misty Moonlight 8-1/2\" X 11\" Cardstock [ 153081 ]")
![Thoughtful Journey 6" X 6" (15.2 X 15.2 Cm) Designer Series Paper [ 163303 ]](https://assets1.tamsnetwork.com/images/EC042017NF/163303s.jpg "Thoughtful Journey 6\" X 6\" (15.2 X 15.2 Cm) Designer Series Paper [ 163303 ]")

